Stereoptica Help - Convert two 2D images to 3D
Purpose
 This software converts two 2D images/photographs, and creates colour or monochrome 3D anaglyphs and stereograms. Compared to most programs of this type, Stereoptica has a unique variety of features including:
Background
At the time, I simply wanted a program to batch convert sets of stereo images into an animation. I couldn't find one, so I created my own. Along the way, I became more interested in how the 3D effect is achieved, and found that the problem of ghosting could be greatly reduced by altering the gamma of the red component in the final stereo image. This along with the above mentioned features, and further development of the program prompted me to release Stereoptica on the web for anyone to use. Hope you find it useful!Quick-start
The program can easily be run from the command line by typing for example:stereoptica l=leftpic.gif r=rightpic.gif
Stereoptica can load and save PNG, JPG, GIF or BMP images. The saved files will be under the name of "stereo_out", and can be found in the directory that the command line is currently in.
It is advised you read and experiment with some of the options below to maximize the 3D effect of your final creation. In particular, the options "swap", "trimout=..." and "trimin=..." can greatly affect the quality of the output.
For those who rarely use the command line: To make things easier, copy any pictures to the same directory as Stereoptica, and then "cd" to that directory path where the program is located by typing:
cd C:\stuff\programs\stereoptica\
(or whereever Stereoptica is located).
Now it should be trivial to use the program and its features.
Options
(replace *** stars with number or name)Global settings:
help           See this options list in the command line
l=***          Replace *** with filename of left pic. E.g.: l=myleftpic.gif
r=***          Replace *** with filename of your right picture
save=***       Enter gif, png, jpg, or bmp for save format (default = png)
col256         Convert from true colour to 256 colours before saving
stereo         Add this parameter for a stereogram instead of an anaglyph
swap           Swaps the left and right pictures (easy fix for bad looking 3D)
trimout=***    Measure in pixels. Crops the outside of pictures (default = 0)
trimin=***     Measure in pixels. Try trimout before this (default = 0)
batch          Batch process multiple images.
frames=***     No. of frames to process if batch is selected (default=0 (all))
Further global settings - Pre-processing of images:
hue=***        Enter from 0 to 6. Cycle hues round colour wheel (default = 0)
reversehues    This addition reverses the hues, so RGB becomes BGR
chroma=***     Enter from 0 onwards. Adjust chroma of images (default = 1)
bright=***     Enter from 0 onwards. Adjust brightness of images (default = 1)
Anaglyph settings (ie. if 'stereo' isn't added as a variable):
monochrome     Removes colour from the anaglyph, but may have slightly nicer 3D
red=***        Adjust red element. Typical values range from 1-3 (default = 1.4)
noenhance      Disable the 3D enhancing colour processing to remove ghosting
evar1=***      Experimental variable 1 for 'enhance' processing (default = 1.2)
evar2=***      Experimental variable 2 for 'enhance' processing (default = 0.2)
Stereo settings (ie. if 'stereo' is added as a variable):
gap=***        The gap (in pixels) between the left and right images
gapr=***       Set the R gap colour from 0-255 (default=0)
gapg=***       Set the G gap colour from 0-255 (default=0)
gapb=***       Set the B gap colour from 0-255 (default=0)
Example usages:
stereoptica l=leftpic.gif r=rightpic.gif
stereoptica l=lpic.png r=rpic.png stereo batch trimout=20 bright=1.5
Further details
Option: save=...
Save out in either png, bmp, gif, or jpg. Preferably in that order. Try not to ever use jpegs for anaglyph images, as the artifacts (even at highest quality jpegs) spoil the effect. Even gif in 256 is preferable, especially with the amazing 256c quantize function courtesy of
Option: stereo
With this paramater added to the command line, a stereogram rather than an anaglyph will be produced.
Compare the difference between these two images:
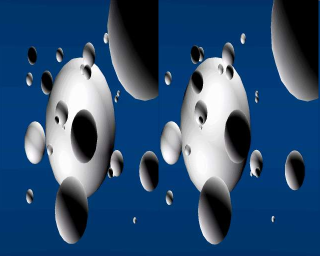 Stereogram |  Anaglyph |
Here are some advantages and disadvantages of both methods.
Stereogram
Disadvantages
Disadvantages
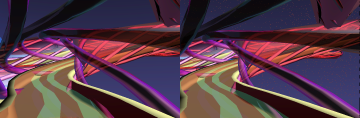
Option: trimout=... (or trimin=...)
With either of these paramaters added to the command line, Stereoptica will crop (in number of pixels) the left or right of the images to remove portions of the image which don't contribute to the 3D effect. As as important side effect, in anaglyph mode (non-stereogram), it will also move the depth of the image into or out of the screen. This is something which can improve the appearance of the 3D effect (ideally, you often want the 3D depth to start at the screen depth and go into the screen).
To demonstrate the advantageous effects of trimming, compare these two images with some anaglyph specs:
 Uncropped | 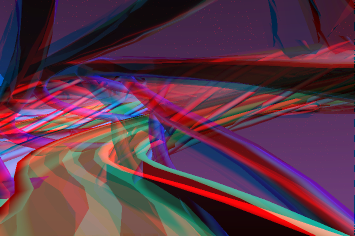 Cropped |
To achieve the best look for anaglyph mode, experiment first with the trimout parameter (sometimes trimin may need to be used). Try and make sure that the front objects are at the same position in both the left and right pictures to achieve best results. For example, look at the road marks in the cropped version - they 'join up' nicely.
In stereogram mode (option: stereo), don't worry about the the above paragraph, and instead just try to make sure there aren't extra portions of screen area on the left and right side of each image, otherwise, these areas will appear strange in the stereogram.
Option: batch
With this parameter included, you will be able to process multiple frames in one go - useful for creating animations. You only need to specify the first left and right pictures as usual, and Stereoptica will automatically look for successive frames. It does this very intelligently by isolating the number in the file/filepath name, and incrementing this by one. For example:
Use in conjunction with the number of "frames=..." if you like, but if "frames=..." is not specified, Stereoptica will look for all possible frames.
Option: frames=...
Use in conjunction with batch. Basically, if you specify this parameter, Stereoptica will do x amount of frames instead of all of them.
Option: hue=...
This neat parameter cycles the hue of the images. Entering a positive number will shift the hues, such that red will become yellow, yellow become green, green become cyan etc.. Possible values are from 0 (default, no change) to 6. In fact 0 = 6, because the function is modulus 6. Compare:
 Original |  Hue shifted by 2/6 |
Option: monochrome
Used for anaglyph mode. Less colour, and generally not as good, though arguably more appropriate for red/green glasses type instead of the red/cyan type. Compare:
 Full colour | 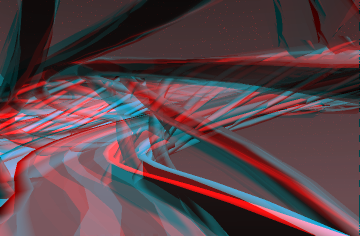 Monochrome |
Option: red=...
Sensible values for this parameter range from 1 to 2 (default=1.4). Because the cyan colour on LCD screens (less so on cathode ray tubes) emits red pollution, it's advisable to increase the red component to partially camouflage any possible ghosting. Once everyone uses the upcoming OLED screen technology, we can drop this feature and just stick with red=1 (no processing).
It's less noticable in this example, but if you look at the bright edge at the right side of the road, the "normal" image has some ghosting just to the right of that (over the dark blue space).
Extra red to reduce ghosting | 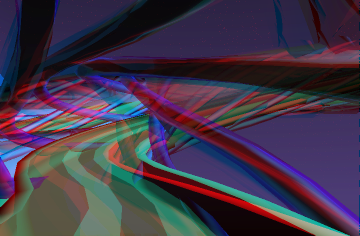 Normal |
Option: noenhance
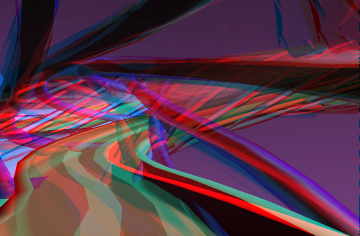
This option turns off one of the nicest features of Stereoptica. Basically, the amount of ghosting is drastically reduced as a result of gamma correction of the red component based on the brightness of the green component. Compare these two images with red/cyan or red/green specs:
 Enhance | 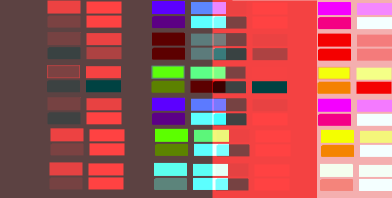 No Enhance (no processing) |
Enhance |  No Enhance (no processing) |
As you can see, the 'enhance' versions have less ghosting (albeit slightly darker). As explained earlier, the problem stems from the fact that monitors and TVs don't display proper cyan, but instead have some red pollution coming through (see the "Eclipse of Mars" illusion at www.skytopia.com for a dramatic demonstration of this). This issue should be alleviated once OLED displays become commonplace, and then maybe you can turn noenhance on!
evar1 and evar2 are experimental variables for use if noenhance isn't turned on. They are 1.2 and 0.2 respectively as default.
Option: gap=...
Where ... represents the number of pixels. In stereogram mode, this inserts a gap between the two pictures. The gap can be any colour, depending on the parameters gapr, gapg, and gapb. Compare:
 Normal |
 With dark blue gap |
Legal stuff
Copyright (c) 2007, Daniel White, Skytopia.comAll rights reserved.
Results (rendered pictures) produced from the program (the binary/exe) may be freely used providing:
1: No more than five frames (pictures) are used for commercial purposes, without my express permission. Anyone wishing to do more than five in total may wish to do so for a reasonable fee by contacting me from:
https://www.skytopia.com/email.html
Furthermore, you may modify the source for your own use (the above clause still applies), but redistribution of the modified source is not allowed without my permission. However, you may use up to 50 lines of code (except the exact code in the "POST PROCESSING" section), or any of the function code in your own projects freely.
Redistribution of the unmodified program is permitted, providing:
1: The software is not sold or used for commercial purposes, without my express permission
2: All of the files are kept together and intact.
THIS SOFTWARE IS PROVIDED BY DANIEL WHITE "AS IS" AND ANY EXPRESS OR IMPLIED WARRANTIES, INCLUDING, BUT NOT LIMITED TO, THE IMPLIED WARRANTIES OF MERCHANTABILITY AND FITNESS FOR A PARTICULAR PURPOSE ARE DISCLAIMED. IN NO EVENT SHALL DANIEL WHITE BE LIABLE FOR ANY DIRECT, INDIRECT, INCIDENTAL, SPECIAL, EXEMPLARY, OR CONSEQUENTIAL DAMAGES (INCLUDING, BUT NOT LIMITED TO, PROCUREMENT OF SUBSTITUTE GOODS OR SERVICES; LOSS OF USE, DATA, OR PROFITS; OR BUSINESS INTERRUPTION) HOWEVER CAUSED AND ON ANY THEORY OF LIABILITY, WHETHER IN CONTRACT, STRICT LIABILITY, OR TORT (INCLUDING NEGLIGENCE OR OTHERWISE) ARISING IN ANY WAY OUT OF THE USE OF THIS SOFTWARE, EVEN IF ADVISED OF THE POSSIBILITY OF SUCH DAMAGE.
************************************************************************************
This software uses the (excellent) FreeImage open source image library.
See http://freeimage.sourceforge.net for details.
FreeImage is used under the FIPL, version 1.0. *************************************************************************************
Through FreeImage, this software also uses the amazing NeuQuant neural-net
quantization algorithm by Anthony Dekker for converting 24 bit images to 8 bit.